
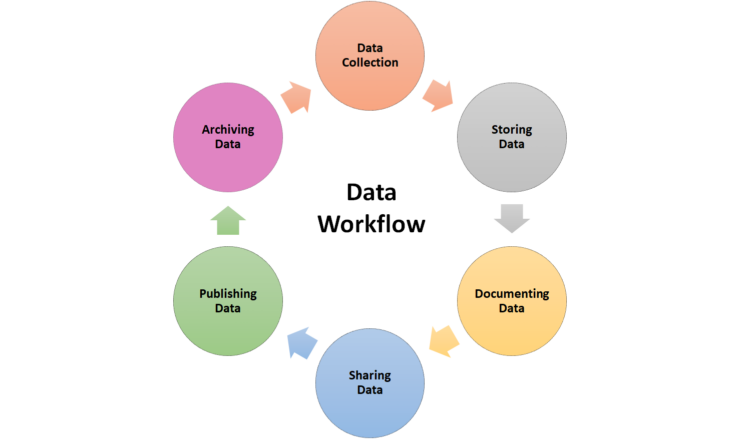
Data Workflow in YoDa
YoDa allows you to store, manage and share your research data in a secure way. Your data is kept in a research group, which is a main folder and you and other collaborators have access to it. You can store your data in subfolders and organize them according to your needs. In Yoda you can collaborate with others by sharing data, adding metadata to make your data findable, archiving data, and publishing it.
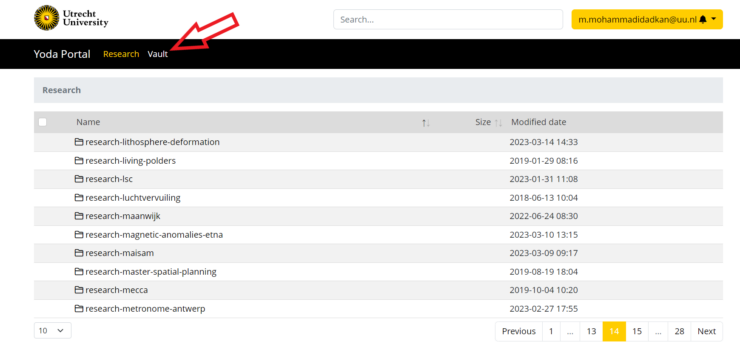
Storing data
You can upload data files/folders in any format on YoDa using the YoDa web portal, YoDa network drive, or iCommands, your data will be stored in your own research-group. If you want to download or upload large or numerous files (more than a couple of files / GB’s), it is recommended to use the Yoda network drive or iCommands instead of the web portal. The most convenient way to store data on YoDa is via the network drive because you can work with your data like as you normally do via the file explorer. For example, you can copy, paste, drag and drop, open, and work on your data using the existing applications and tools on your local system.
Documenting the data that you uploaded in YoDa is a crucial step to adding more value to the data and making it Findable, Accessible, Interoperable, and Reusable (FAIR). After you have uploaded the data, you should document it in two steps:
- Filling out the metadata form on the web portal
- Adding a README file in the data main folder (also in subfolders if necessary)
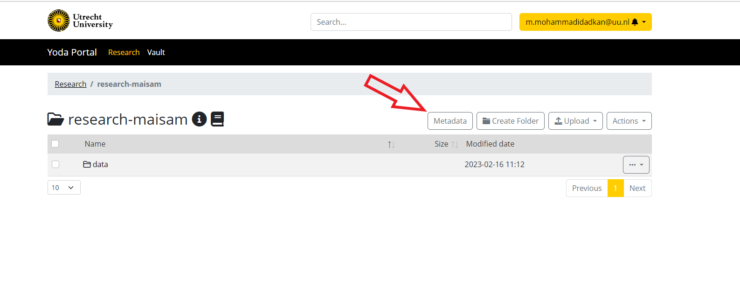
To fill in the metadata form, login to the web portal and follow the steps below:
- Go to the main folder of the dataset that you want to add metadata there and click on the metadata button
- In the opened form, you will see many fields that you have to fill in. A couple of them are labeled with a red frame which means they are mandatory for publishing or archiving data later. Keep in mind that you do not need to fill in all the fields at the beginning and you can update them any time before publishing or archiving the dataset.
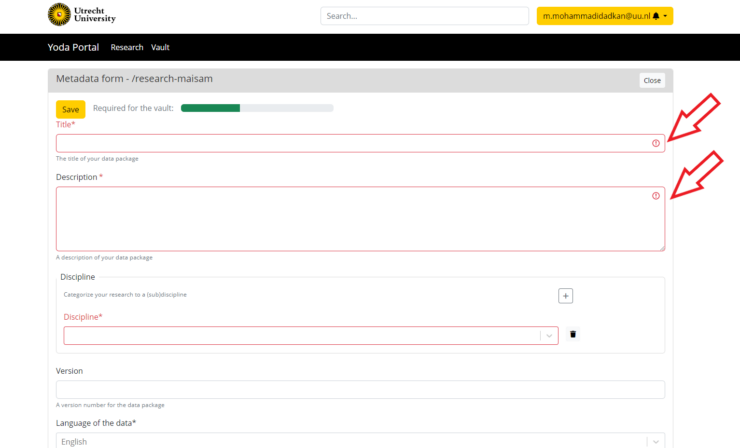
- When you have filled in at least one field and saved the form, a yoda-metadata.json file will be created in the folder you are in. This file contains all the information that you have filled in the form.

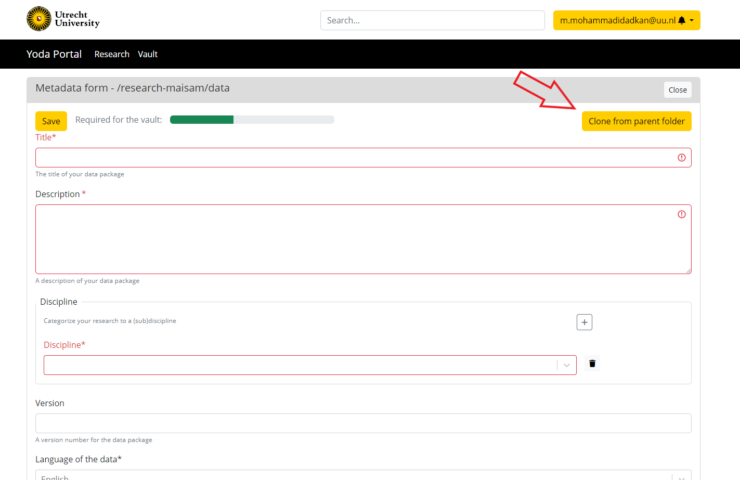
- You can also add metadata to the subfolders if necessary. If there is common information between the main folder metadata and the current folder, you can use the ‘clone from parent folder’ button to import the information from the main metadata form and modify it whenever needed.
Another part of data documentation is providing a README file in which all relevant information of the dataset is mentioned there. The README file is also reviewed to assess the quality of the dataset and help others to understand and reuse it. The Geo Data Team provides guidance and a few templates for writing README which you can find via the links below:
You can grant other persons different levels of access to your data. The different levels are;
- Read-only
- Read and write
- Group manager (which includes read and write permissions and gives the ability to grant access to others),
Access will be provided for the main folder, which means you cannot give others access to subfolders individually.
To give access to other researchers, you need to have group manager permissions on at least one research folder and follow the steps below:
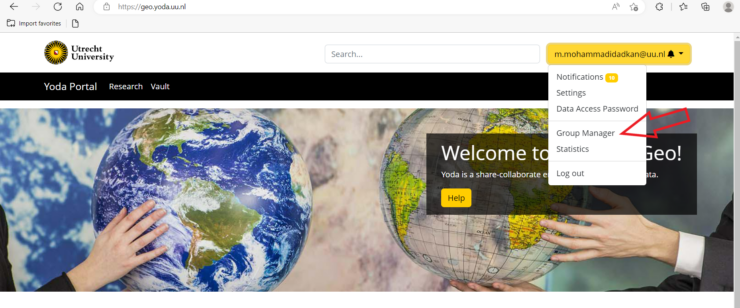
- Go to your personal page on the YoDa web portal and open the menu on the top-right where your email address is shown and select the group manager
- Keep in mind that when you add a user with an external e-mail address, an e-mail for setting up their personal password will be directly sent. Make sure that this person has received additional instructions that he has granted access to the YoDa folder of your choice. On the next page, you will see the groups in which a folder is included where you have manager permissions on the left side. When you unfold the group, you can find the folder that you would like to add a collaborator to it. You can also search for the folder by typing in the folder name (or a part of it) in the ‘filter groups’ field. When you have found the research folder, click on it and a group manager menu shows up on the right. On the bottom-right, you can add the email address of the person that you would like to add to the research folder and click on the add button.
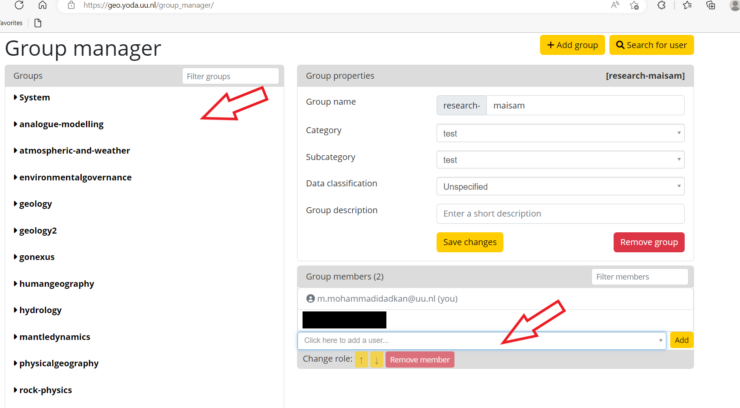
- The role (access level) of a newly added member to the research group is by default read-write. You can change the role of the members using the up and down arrows next to the “change role”.

The icon next to the email address of each member of the research group shows the role of the member.
The icons mean:
Read-only role: The user can view and download files or folders from the research group.
Read-write role: The user can download, upload, modify, or delete files and folders in the research group.
Manager role: The user, in addition to the read-write access, can add or remove users to/from the research group.
YoDa provides a work flow to archive your data at any time in order to preserve it for the long term. It is a way to secure different versions of your data in the data processing lifecycle and keep track of that. For instance, when you have executed all activities related to pre-processing of your dataset, it is recommended to keep a backup of the pre-processed data for future reference. In YoDa, you can archive the full or part of your dataset by submitting it to the vault. Each research-folder has an associated vault-folder. In YoDa, you can access the vault-folder via the “Vault” tab next to the research folder.
To submit your dataset to the vault, you need to follow the steps below:
- You have to fill in the metadata form completely and make sure that a data documentation file (e.g. README.txt) is included in the dataset which consists of all the information that is needed to interpret the dataset.
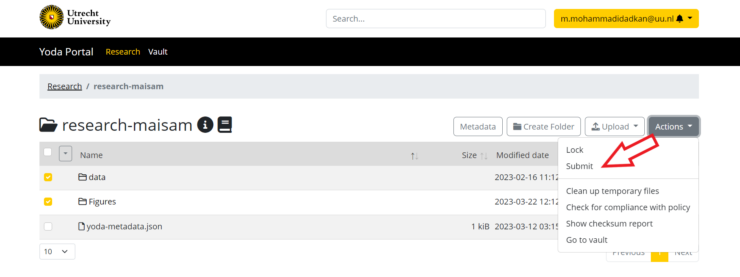
- Select the folders that you want to archive, then from the “Action” menu select submit. After the submission is complete, the dataset will be labeled as submitted and the data manager(s) will receive a notification to review your dataset.
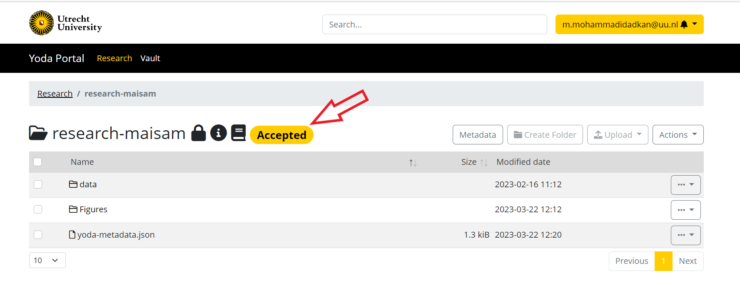
- When the data manager(s) review the dataset, they might ask you via email to modify the dataset or provide more information. After the data manager(s) approve the submission, the status of your dataset will be changed to “Accepted”. If the submission is accepted, a copy of your data – including the metadata – is now in the vault and the data cannot be changed (the data manager(s) can still adjust the metadata). You can still work on the data that is still in the research-group (remember that only a copy was made and placed in the vault). If you would want to submit an updated version of your folder to the vault, repeat the above processes. A new copy of the selected folder(s) will be placed in the vault. The old copy will not be overwritten and remains available.
- Now you can see the snapshot of your dataset in the vault-folder. You can keep it there as a snapshot of your dataset and to keep track of the changes that you make during your data analysis. Whenever you decide to publish any version of your dataset which is in the vault-folder, you can submit it for publication.
Once your research project has been finished, you may want to consider publishing the research data you have used. By publishing your data, you increase your visibility in your scientific domain, and you increase the reuse of data which helps research and researchers. You can publish data at any moment, whether you want to wait until your manuscript is accepted for publication by a journal or not. In the metadata of YoDa, you can specify whether the data should be openly accessible or not. If the data is not published with the data access type ‘closed’, only the metadata will be published.
Be aware that the publication of data is a decisive step, just like the publication of your manuscript in a journal. You must make sure that your data is correct, well-structured, and well-described. Once published, it is findable and accessible by other researchers around the world. There is an option to unpublish a data package within YoDa, but it is hardly used and will not be recommended. Researchers accessing the DOI (Digital Object Identifier) that originally lead to your data, will then be guided to a landing page describing why the data is not available anymore. This is like revoking a manuscript in a journal and can, therefore, be quite a severe step to take.
Publishing data is done through the website portal. To publish data:
- You should have first archived the folder containing the data that you want to publish as explained in the “Archiving data” section. Find your archived folder in the vault which you want to publish.
- Click under “actions” on ‘Submit for publication‘. You will receive a screen with a publication agreement, containing a message asking whether you are sure you want to publish. Click on the tick box that you are agreeing the above mentioned statements and click on ‘Confirm agreement’

- The data manager(s) will be notified about your request for publication. The data manager(s) evaluate the request again to make sure that no aspects during the archival process were overlooked. If everything is verified, the data manager(s) will approve the request. After approval, the data will be published through YoDa and a DOI and a landing page will be assigned. You can use the URL to the landing page, to refer to the data published in your associated paper/article you like to publish, in your future research works or professional pages (Pure, ResearchGate, LinkedIn, etc).
When a submission for publication is finalized, the status of your dataset will be changed to “Published”. This also means that DOI and URL to a landing page can be found in the system metadata, which can be consulted by clicking on information button. All steps performed in the archival and publication work flows will be registered in the provenance information, which can be consulted by clicking on the book button.
Back to the YoDa User Manual Main Page
Read How to Access YoDa