Yoda Command Line Access
Configuring iCommands for Yoda
iCommands is useful for handling large datasets or interacting with Yoda while you are coding. iCommands only works on a handful of Linux operating systems. If you are a Windows user, the easiest way to use iCommands is to install and configure Windows Subsystem for Linux (WSL).
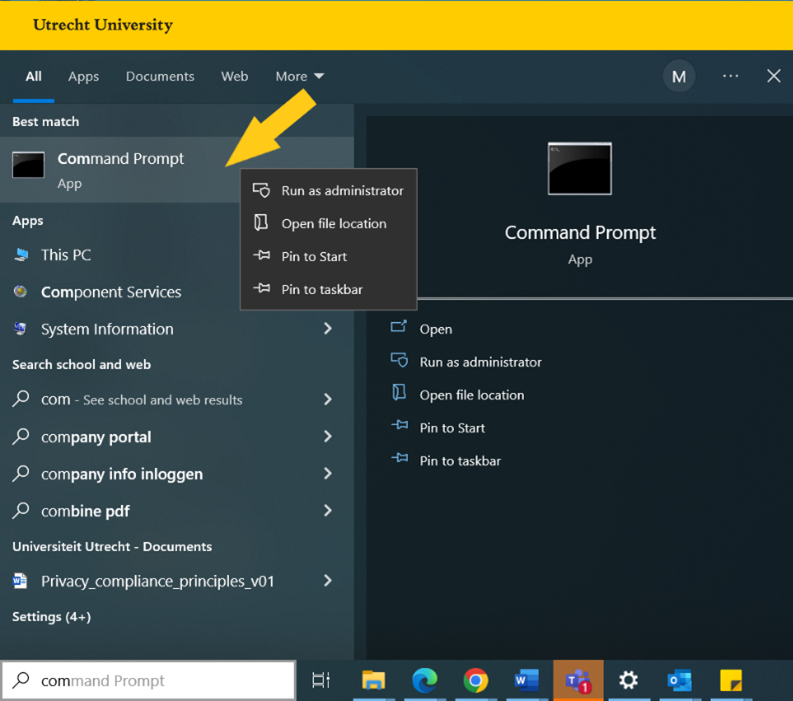
To start installing iCommands, open a command prompt as an administrator as is shown below:
⚠️ If you don’t have local admin access on your UU laptop, contact ITS to assign local admin permissions to you

Then, follow the steps below:
- Install Ubuntu 18.04 on WSL
wsl --install -d Ubuntu-18.04
After you have completed the installation, you will be asked to choose a username and password for Ubuntu and restart the system. Then you can find the Ubuntu CLI environment by searching “ubuntu” on your search bar.
- Install iCommands on Ubuntu (copy and paste each command separately) by opening the Ubuntu app and type;
sudo apt-get update
sudo apt-get install -y --only-upgrade ca-certificates
wget -qO - https://packages.irods.org/irods-signing-key.asc | sudo apt-key add -
echo "deb [arch=amd64] https://packages.irods.org/apt/ bionic main" | sudo tee /etc/apt/sources.list.d/renci-irods.list
sudo apt-get update
sudo apt -y install irods-runtime=4.2.11-1~bionic irods-icommands=4.2.11-1~bionic
- Prevent automatic upgrades of these two packages
sudo apt-mark hold irods-runtime irods-icommands - Network Tuning, ad hoc, and permanent
echo "120" | sudo tee /proc/sys/net/ipv4/tcp_keepalive_time
echo "30" | sudo tee /proc/sys/net/ipv4/tcp_keepalive_intvl
echo "net.ipv4.tcp_keepalive_time=120" | sudo tee -a /etc/sysctl.d/99-sysctl.conf
echo "net.ipv4.tcp_keepalive_intvl=30" | sudo tee -a /etc/sysctl.d/99-sysctl.conf
- Create a config file:
Make the “.irods” directory:
mkdir ~/.irods
If the directory already exists, you might get an error. Then run the following command to make the config file:
touch ~/.irods/touch irods_environment.json
- Open and modify the config file
nano ~/.irods/irods_environment.json
copy the following text (including the brackets) in there. This config file is only for using the Yoda instance of the faculty of geosciences:{ "irods_host": "geo.data.uu.nl", "irods_port": 1247, "irods_home": "/nluu11p/home", "irods_user_name": "exampleuser@uu.nl", "irods_zone_name": "nluu11p", "irods_authentication_scheme": "pam", "irods_encryption_algorithm": "AES-256-CBC", "irods_encryption_key_size": 32, "irods_encryption_num_hash_rounds": 16, "irods_encryption_salt_size": 8, "irods_client_server_negotiation": "request_server_negotiation" }and replace “exampleuser@uu.nl” with your UU email address (or the email address that you are registered in Yoda) and save it (ctrl+x, y, and 2 times press enter).
- Login to Yoda via iCommands
If you have done all the above steps successfully, you can log in to Yoda via iCommands using:iinit
and fill in your Data Access Password (DAP) where it is asked.
⚠️ Keep in mind that while you are typing the password on the command line, it does not show anything on the screen (dots, asterisks, bullet points, or similar characters).
Now you have access to Yoda via iCommands, and you can start using the standard iRODS commands to interact with Yoda.

